Shrinking My Homelab: Migrating to the DeskPi RackMate
Table of Contents
Why Downsize?
If you run a homelab, you know the struggle—space, heat, noise, electrical and just the sheer sprawl of hardware. I’ve transitioned my Homelab from multiple old laptops, various cloud platforms, full rack servers, to raspberry pi farms. I have been running an enclosed 19" 24U rack for a couple years now, and the current hardware is detailed below. After seeing Project Mini Rack by Jeff Geerling, I started reconsidering the setup. My original plan was an 8U and a 4U DeskPi RackMate (T0/T1) for a combined 12U, but the 8U sold out as I was ordering so I pivoted and picked up three 4U units instead.
What I Had to Buy
| Item | Quantity | Additional Information |
|---|---|---|
| DeskPi RackMate T0 (4U) | 3 | Primary rack units for mounting devices. |
| Network Patch Panel (0.5U) | 1 | Helps manage network cable organization efficiently. |
| M3x30mm Hex Screws | Pack | Used for stacking the racks. |
| M3-0.5 Wing Nuts | Pack | Secures stacked racks together. |
| GeeekPi DeskPi RackMate SBC Shelf (1U) | 3 | Holds Raspberry Pi devices. |
| GeeekPi Vented Rack Shelf (0.5U) | 3 | Provides airflow and extra mounting space. |
What’s in My Homelab?
My homelab is a hybrid of compute architectures with networking ranging from 1-10G. I discovered the potential of refurbished mini PCs through Project TinyMiniMicro , which led me to integrate several into my setup. Here’s the final setup:
Hardware Overview
| Device | Rack Space (U) | Additional Information |
|---|---|---|
| Network Patch Panel by DeskPi | 0.5U | Helps manage network cable organization efficiently. |
| Raspberry Pi Cluster (5 total) | 3U | Housed in three DeskPi 1U shelf accessories, each holding two Pi’s. |
| Lenovo ThinkCentre (1 total) | 1U | Great for Proxmox, Kubernetes, and lightweight services. |
| HP EliteDesk (4 total) | 4U | Excellent for virtualization, container workloads, and Proxmox/Kubernetes services. |
| YuanLey 8-port POE unmanaged Gigabit Switch | 1U | Handles PoE needs for IoT and cameras. |
| XikeStor 8-port Managed 2.5G Switch | 1U | Faster networking for high-bandwidth applications. |
| BliKVM with PiKVM software | 1U | Connected to two daisy-chained ezcoo switches, managing 7 systems remotely. |
| EluTang 120mm Fans (2 total) | N/A | Mounted at the top and bottom for optimal airflow. |
The Build Experience:
Wins
- Compact & Manageable – Moving from a large enclosed rack to a modular, open 10" rack made everything easier to work with.
- Better Airflow – The open design helps with cooling and airflow, making it a noticeable improvement over my previous enclosed rack. I very likely didn’t have enough fans in my enclosed rack.
Struggles
- Rack Mounting Issues – The DeskPi RackMate has some alignment quirks with the hole’s not being exactly the same distance apart, making pre-planned mounting difficult.
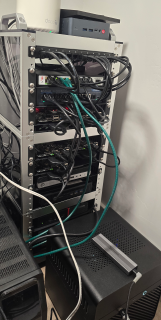
- Cable Management is Brutal – The photo below conveniently ignores the side of the Rack which is a tangled disaster. Open racks give you flexibility but expose your mess!
Notes
- Mounting System – The DeskPi RackMate opted to use #10/32 threaded holes instead of square holes for its mounting system. While this works, it makes the rack less compatible with cage nut solutions. I own a bunch of RackStuds , which make mounting in square racks easier, but they aren’t usable here. I personally would have liked to see the square mounting solution used (and, of course, fixing the inconsistent spacing) but it’s not a huge issue.
Mini-Review: DeskPi RackMate
The DeskPi RackMate is a great, simple solution if you’re looking to set up a 10" rack. It offers a modular and compact design, making it easy to work with, especially for small homelabs. However, for an open rack, it is on the expensive side, considering that you could DIY a similar setup. Jeff Geerling lists several other 10" solutions in the Project Mini Rack linked above varying in size and with enclosed and open designs as well.
One advantage for off-the-shelf was being able to purchase everything through GeeekPi on Amazon, saving significantly on shipping costs. Each item is more expensive on Amazon than from DeskPi’s website, but ordering directly from DeskPi’s website would have ultimately been more expensive due to shipping fees. One issue is that while DeskPi includes rack-mounting hardware for stacking their racks on their website, this was not available on Amazon. Fortunately, DeskPi provides specifications for the screws they use, so I was able to purchase generic M3x30mm screws with Wing Nuts, which worked perfectly for stacking. Note that while they use M3 screws for mounting the panels, the rack screws are #10/32 threaded.
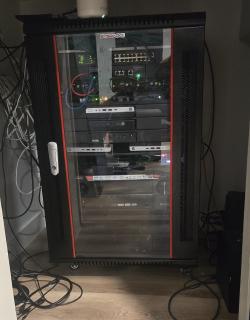
The Conversion
| 24U | 12U |
|---|---|
|
|
Future Considerations
Homelabs are constantly evolving, offering tech enthusiasts and professionals a platform to experiment, learn, and self-host services. Rack-mounting your homelab brings order to the chaos, keeping everything organized and modular. Additionally, I’ve transitioned all of my workloads to Kubernetes, using my mini PCs and Raspberry PI’s to create a lightweight yet powerful clustered environment.
Looking ahead, I’m considering adding a second 10" rack to assist with cable management and power distribution. One of the challenges with compact racks like this is managing power bricks for each of the mini PCs. To address this, I’m thinking about 3D printing custom mounts to neatly organize and secure these power bricks.
Additionally, I plan to mount a couple of PDU’s for power distribution and provide a stand for my battery backup APU to ensure stable and reliable power management across the setup. This second rack would significantly improve the organization of my homelab and reduce cable clutter, making maintenance even easier.
I may, however, opt to replace my Mini PC’s with CM5 clusters. Cost for Performance, the Mini PC’s are better than the ARM Compute Modules but they have drawbacks in size and power. If I’m honest, there’s nothing running in my homelab that requires the extra compute from the x86 hardware so adding 6-12 CM5 modules to replace 5 Mini PC’s will likely be more manageable.
Final Thoughts
Was this worth it? I think so. I’m not sure if this end result is a significant improvement over the standard rack I had before, but this setup is modular, and more compact. While cable management remains an ongoing battle, the overall experience has been great.
If you’re thinking about reworking your homelab, I’d love to hear your approach. Are you embracing mini racks, or any rack-solution or some other innovative setup? Drop a comment below!